Spare Pool , Auto-Rebuild, and Manually Rebuilding a Critical RAID Array
- Tutorial Videos & Installation Guides
-
FAQ
FnL Product Line Determining PCIe lane assignment for your SSD7000 Controller MacOS Windows Linux SSD6200 Series Controller SSD7000 Series Controller RocketStor Series RocketRAID Series RocketU Series Motherboard Compatible Report Other Questions Standard Responses for Known Issues or Subjects WebGUI eStore Gen5
- HPT
- Compatibility Reports
- FAQ
- Workaround Issue
Spare Pool, Auto-Rebuild, and Manually Rebuilding a Critical RAID Array
1. What is the Spare Pool and when should it be used?
A Spare Pool is a selection of drives that can be used to rebuild a redundant RAID array if it enters a Critical status. A Critical status can be triggered by disk failure or a physical disk related problem, such as a disk failing to respond to commands, I/O related issue, or a SMART attribute error. The HighPoint WebGUI and CLI management software allow administrators to create and manage Spare Pools.
1. A spare disk is a physical drive that can be used to replace a “critical disk” (failed or suspect failed drive) in a redundant RAID array (RAID 1, 5, 6, 10, 50). Spare disks can be manually added to a critical array using the WebGUI or CLI, or can be automatically added by the controller if the “Auto Rebuild” option is enabled under Settings.
2. Disks added to the spare pool will be displayed under the Spare Pool submenu located on the right-hand side of the Logical tab. Disks can be easily added to or removed from the Pool by clicking the box before each target disk, and pressing the Add Spare or Remove Spare buttons:
3. When Auto-Rebuild is enabled, and a disk failure occurs, a Spare drive will be automatically used to rebuild the critical array.
4. This feature minimizes the chance of data loss by reducing the time the array is in a critical state.
2. How can I enable the Auto-Rebuild feature?
1. Auto-Rebuild can be enabled under the Settings tab. It is enabled by default:

2. When a physical drive fails, the controller will take the drive offline. If this drive is still detected by the controller it will be labeled as a critical or disabled drive. The controller will not initiate a rebuild process unless Auto-Rebuild is enabled, even if Spare Disks are available, or the failed drive was manually replaced.
3. How can I manually rebuild a critical/broken array?
A Critical array should be rebuilt as soon as possible to restore redundancy. If Auto-Rebuild is not enabled, you can manually rebuild a Critical array. Several options are discussed below.
1. Insert a new disk (or physically replace the failed disk).
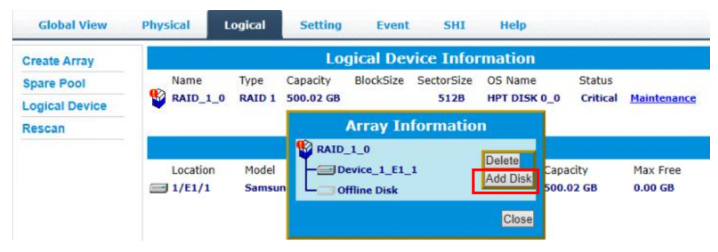
After inserting/installing a new disk, you can use the Add Disk button under Maintenance to add the disk to the array and start the Rebuild process: 
2. Manually add an existing Spare disk.
If a Spare Disk is available from the Spare Pool, you can use the Add Disk button under Maintenance to add the disk to the array and start the Rebuild process:
Notes:
1) To avoid a rebuild failure, it is important not to restart or shut down the system during the rebuild process.
2) A drive that has been flagged as “Failed” or “Disabled” should be removed and replaced as soon as possible.